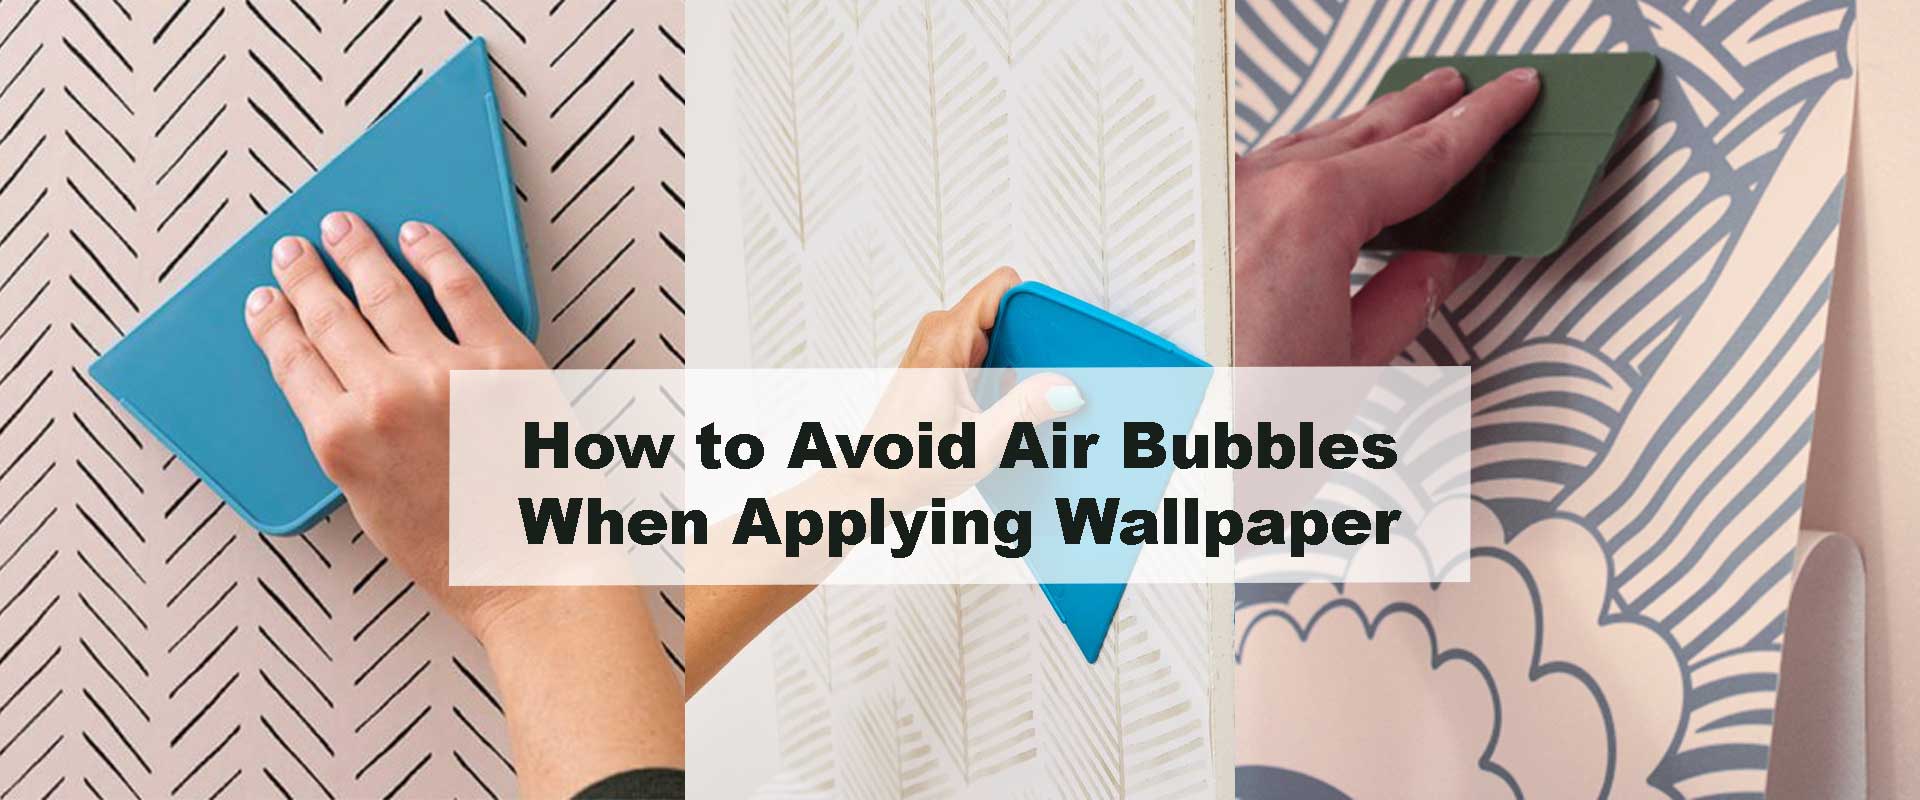
How to Avoid Air Bubbles When Applying Wallpaper
Nothing ruins the satisfaction of freshly hung wallpaper like air bubbles sneaking beneath the surface. Even the most stunning floral design can appear uneven if pockets of air remain trapped. With a few professional techniques and the right preparation, you can avoid air bubbles when applying wallpaper and achieve that crisp, seamless finish every wall deserves.
Why Air Bubbles Appear Beneath Wallpaper
Air bubbles form when air or moisture gets trapped between the adhesive and the wall. Uneven surfaces, excess paste, or dust are often to blame. Peel-and-stick wallpapers can also develop bubbles if applied too quickly or without proper smoothing. Understanding these causes helps you apply everything from modern floral wallpapers to delicate vintage designs with precision and ease.
Proper Application Technique
Start from the Center and Smooth Outward
Begin by aligning your first strip carefully, then smooth it from the center toward the outer edges in deliberate, overlapping strokes. This simple habit ensures air moves naturally out from beneath the surface before the adhesive begins to set. Working this way prevents small pockets from forming and keeps your wallpaper lying flat and even across the wall.
Apply in Small, Controlled Sections
Rather than handling a full strip at once, focus on manageable portions. For paste-the-wall papers, spread adhesive evenly over a section no wider than your arm span before placing the sheet. For peel-and-stick wallpapers, release just six to eight inches of backing at a time, smoothing as you go. This steady rhythm maintains full control, reduces stretching, and prevents air from being trapped as you work.
Balance Pressure for a Perfect Finish
Consistent pressure is the secret to flawless adhesion. Glide your smoother with firm, even strokes—strong enough to press air out, gentle enough to preserve the pattern’s alignment. Over-pressing can distort designs or squeeze out adhesive, while too little pressure leaves soft pockets underneath. With a balanced touch, the paper bonds seamlessly, giving your floral wallpaper a crisp, professional appearance that lasts.
Select the Right Wallpaper Type
Match Material to Technique
Different wallpapers demand different care.
- Paste-the-wall papers require even adhesive coverage.
- Vinyl papers are moisture-resistant but can trap air if stretched.
- Peel-and-stick wallpapers need extremely smooth walls for best adhesion.
Choose your design thoughtfully — graceful modern floral patterns and romantic vintage florals both install beautifully when applied with care.
Mind the Environment
Temperature and humidity play major roles. Work in a space that’s dry and moderate — ideally between 20–25°C — to prevent the adhesive from drying too quickly or failing to cure.
Essential Tools for Bubble-Free Wallpapering
Having the right tools can transform your installation experience. A smoothing brush, plastic smoother, seam roller, utility knife, and level ensure every strip lays flat. Each helps distribute pressure evenly, reducing the chance of hidden air pockets. These tools, highlighted in Tools You Need for a Perfect Wallpaper Job, form the foundation for a flawless finish.
Applying Wallpaper the Right Way
Work from the Center Outward
Start smoothing from the center of each strip and move toward the edges. This technique gently pushes trapped air away before the wallpaper adheres permanently.
Take It Slow
Whether you’re pasting a wall or peeling backing paper, work in small sections. For peel-and-stick designs, expose only six to eight inches at a time and smooth as you go. This slow, steady approach is the best way to prevent hidden air pockets.
Apply Even Pressure
Use steady, balanced pressure with your smoother. Too little leaves gaps; too much can distort patterns. Maintaining a consistent rhythm ensures a polished finish without warping the design.
Handling Corners and Tricky Spots
Corners, edges, and window frames can easily trap air. Overlap slightly at each joint, smooth firmly, then trim the excess along the crease with a sharp blade. For designs that carry across openings or corners, techniques from How to Wallpaper Corners & Windows make alignment effortless and clean.
Correcting Bubbles After Installation
Even with perfect prep, the occasional bubble might appear. Knowing how to fix them saves time and frustration.
| Bubble Type | Common Cause | Best Solution |
|---|---|---|
| Small air pockets | Incomplete smoothing | Pierce gently with a pin, press air outward |
| Large soft bubbles | Uneven adhesive | Lift, reapply paste, and smooth again |
| Wrinkled areas | Overstretching | Peel back carefully and reapply evenly |
Give wallpaper 24 hours to dry before making final adjustments. Many small bubbles naturally flatten as adhesive cures.
Pro Tips to Keep Bubbles Away
Wallpapering is as much about rhythm as precision. A few mindful techniques during installation can make all the difference between a flawless finish and a frustrating redo.
1. Give Each Strip a Moment
After hanging a strip, allow the adhesive a short minute to settle before smoothing the next. This pause lets trapped air escape naturally and keeps paste distribution even. Patience here prevents uneven adhesion and ensures each panel aligns perfectly without tension.
2. Double-Cut for Invisible Seams
Instead of overlapping edges, place the next strip slightly over the first and use a sharp blade to slice through both layers. Remove the trimmed excess to create a seamless joint that lays completely flat. This professional method is especially useful when working with detailed floral wallpapers or large botanical prints where visible seams could interrupt the flow of the pattern.
3. Control the Paste, Don’t Overload It
A thin, even layer of adhesive is all you need. Too much paste traps moisture beneath the surface, leading to slow drying and hidden bubbles. Applying just enough ensures strong bonding while maintaining a breathable finish.
4. Roll and Seal With Care
Once each strip is aligned, run a seam roller gently along the joins. This subtle pressure secures the edges without squeezing adhesive outward. Consistent rolling helps every seam stay tight and invisible, enhancing the wallpaper’s polished look.
Tips for Peel-and-Stick Wallpapers
Self-adhesive wallpapers require a slightly different approach, as vinyl materials react to temperature and handling. Following a few careful steps keeps these designs flawless.
Keep the Material Warm and Flexible
When vinyl becomes too cold, it stiffens and loses its grip. Warming the material slightly—either by allowing it to rest in the room for a few hours or by gently heating with a hairdryer on low—makes it pliable and easier to smooth flat.
Apply Gradually for Better Control
Peel only a few inches of the backing at a time, smoothing each section thoroughly before continuing downward. This measured pace helps prevent wide pockets of trapped air and gives you time to adjust alignment for intricate modern floral patterns.
Seal Porous or Chalky Walls
Matte or porous surfaces reduce adhesion and cause bubbling later. Always seal these walls with a light primer before applying peel-and-stick wallpaper. Designs with gentle tones such as watercolor floral wallpapers or softly styled aesthetic florals benefit most from this preparation, as their subtle patterns highlight even the slightest surface irregularities.
Environmental Factors That Influence Wallpaper Smoothness
The surrounding environment affects how adhesives behave. Excess humidity slows drying, while extreme heat causes premature curing. Choose a calm, temperate day to work—ideally around 20–25°C with moderate airflow. Avoid applying wallpaper immediately after painting or during damp weather. Balanced conditions keep moisture levels stable, preventing air from becoming trapped under the surface.
Test Before Committing to the Full Wall
Testing is one of the simplest yet most overlooked steps. Apply a small section first to gauge adhesion, smoothing behavior, and drying time. This mini trial reveals how much pressure you’ll need and whether any bubbles return once dry. It’s especially helpful when working with darker florals or textured vinyls, where imperfections show more easily.
Curing and After-Care
After installation, resist the urge to touch or decorate immediately. Let your wallpaper rest for at least 24 to 48 hours so the adhesive cures completely. Keep the space ventilated but avoid direct airflow from fans or air-conditioners, which can cause uneven drying. Once set, your walls will remain smooth and beautifully finished—ready to frame, furnish, and admire.
Frequent Causes of Air Bubbles
Even small oversights can undo great work. Watch out for these common errors:
- Applying wallpaper on damp or unsealed surfaces.
- Skipping primer or surface cleaning.
- Using too much paste or adhesive.
- Rushing the process without smoothing evenly.
- Ignoring drying intervals between strips.
Avoiding these pitfalls ensures your wallpaper—whether vintage, dark floral, or modern botanical—maintains its pristine finish and lasting appeal. The same attention to preparation discussed in Preparing Textured Walls for Wallpaper applies here too: smooth, sealed walls are the foundation of every perfect installation.
When to Reapply Instead of Repair
Persistent large bubbles, especially under vinyl or peel-and-stick designs, might require partial reinstallation. Carefully lift the affected area, clean the surface, and smooth again using controlled pressure. In some cases, removing and reinstalling a fresh piece is more efficient. Removing Old Wallpaper Before Installing Florals covers safe removal methods to protect the wall surface.
FAQs About Avoiding Air Bubbles When Applying Wallpaper
1. Can I fix bubbles after wallpaper dries?
Yes. Use a fine pin to puncture the bubble and press out trapped air gently. If it’s large, lift and reapply adhesive evenly.
2. Why do bubbles form the next day?
Moisture expansion or uneven drying can create small air pockets. Proper priming and curing prevent this.
3. How do I stop bubbles in peel-and-stick wallpaper?
Smooth gradually from the center outward and seal the surface before application.
4. Are specific tools necessary?
A smoother, seam roller, and sharp blade are essential for an even finish.
5. What if bubbles reappear after a week?
Persistent bubbles usually mean hidden moisture or wall issues. Remove the section, allow it to dry, and reinstall carefully.
Conclusion
Air bubbles can undo hours of hard work, but they’re entirely preventable with the right preparation and patience. Clean walls, consistent pressure, and thoughtful timing turn wallpapering into a rewarding, bubble-free process. Whether dressing a space with timeless floral wallpapers or refined watercolor prints, mastering these techniques guarantees professional, lasting results that elevate any interior.